10 Free Document Scanning Software To Scan Receipt & Digitally Archive Expense Reports
Microsoft Office Document Imaging was a feature installed by default in Windows 2003 and earlier. It converted the text in a scanned image to a Word document. Redmond removed it in Office 2010, though, and as of Office 2016, hasn't put it back yet.

How to Edit Microsoft Office Document Imaging OCR
Microsoft Office Document Imaging (MODI) is removed. To retrieve the feature, here is a thread for your reference: Retrieve Features that have been deleted for Free - MODI, Picture Manager and ClipArt Thanks, Jim -----* Beware of scammers posting fake support numbers here. * Kindly Mark and Vote this reply if it helps, as it will be beneficial.

How to open MDI files in Microsoft Office 2007 Tech Kaki
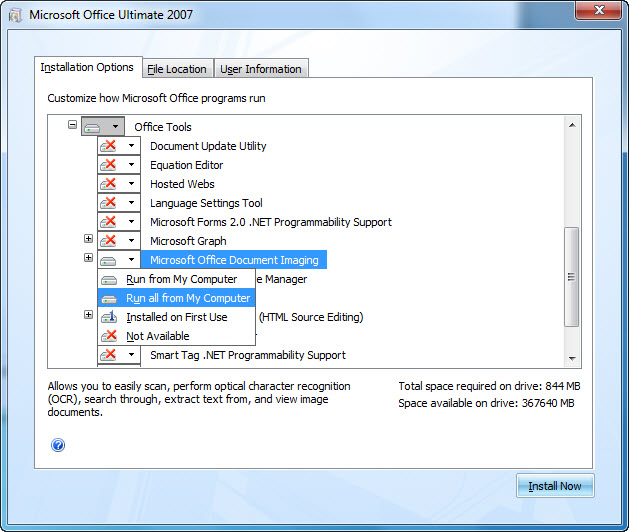
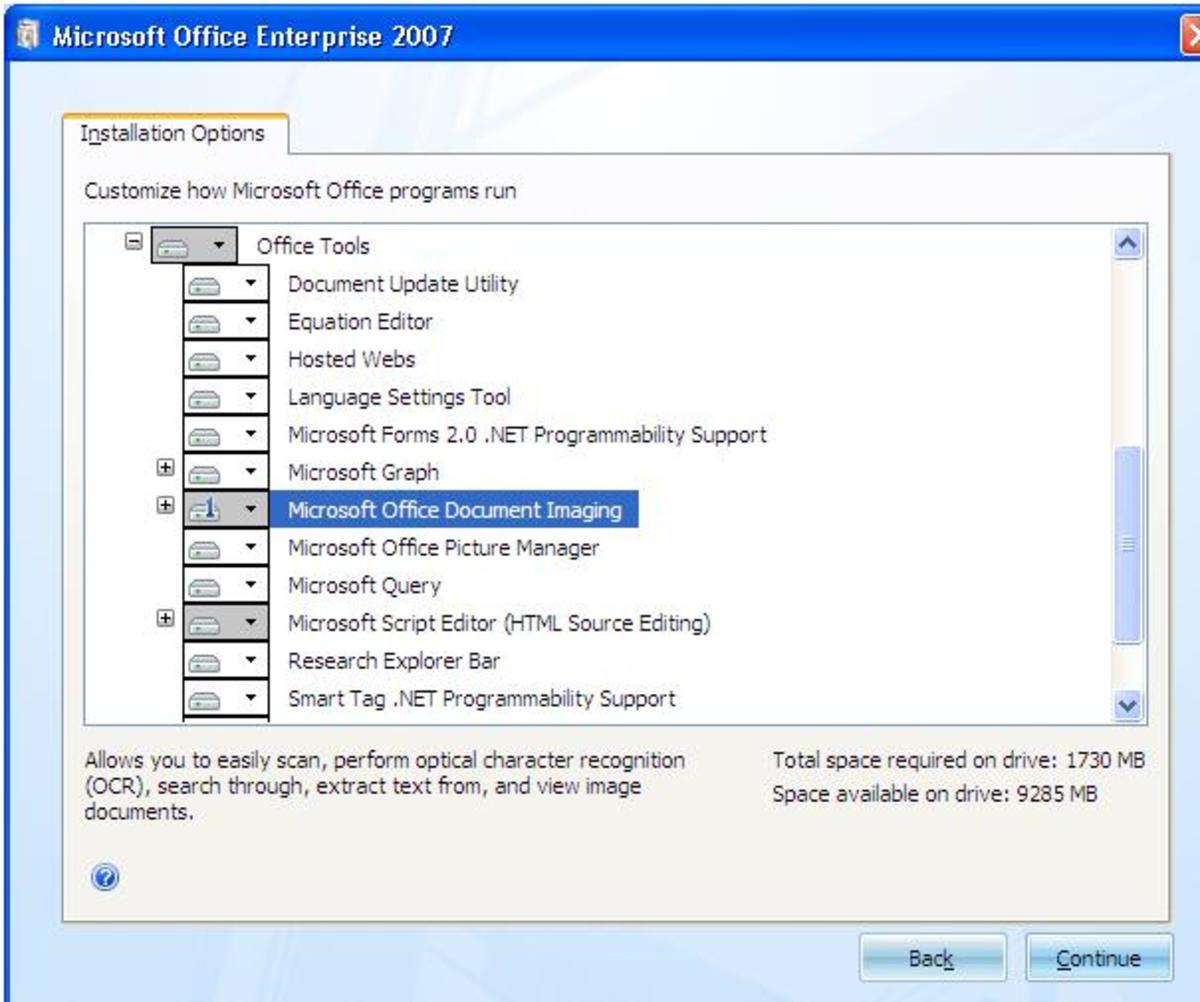
Expand the Office Tools tree to see the Microsoft Office Document Imaging option. 5. Click the down arrow for the Microsoft Office Document Imaging option, and then select Run all from My Computer to include all of MODI in the SharePoint Designer installation. 6. Click Install Now.
How To Edit Microsoft Office Document Imaging TIFF Files Bright Hub
In Microsoft Document Imaging, click on the "File" menu. Select "Save As" or "Save Text to File" to open the saving options window. Choose the location where you want to save the file and enter a name for the Word document. From the "Save as type" drop-down menu, select "Word Document (*.docx)" or the desired Word format.
Microsoft office document imaging windows 10
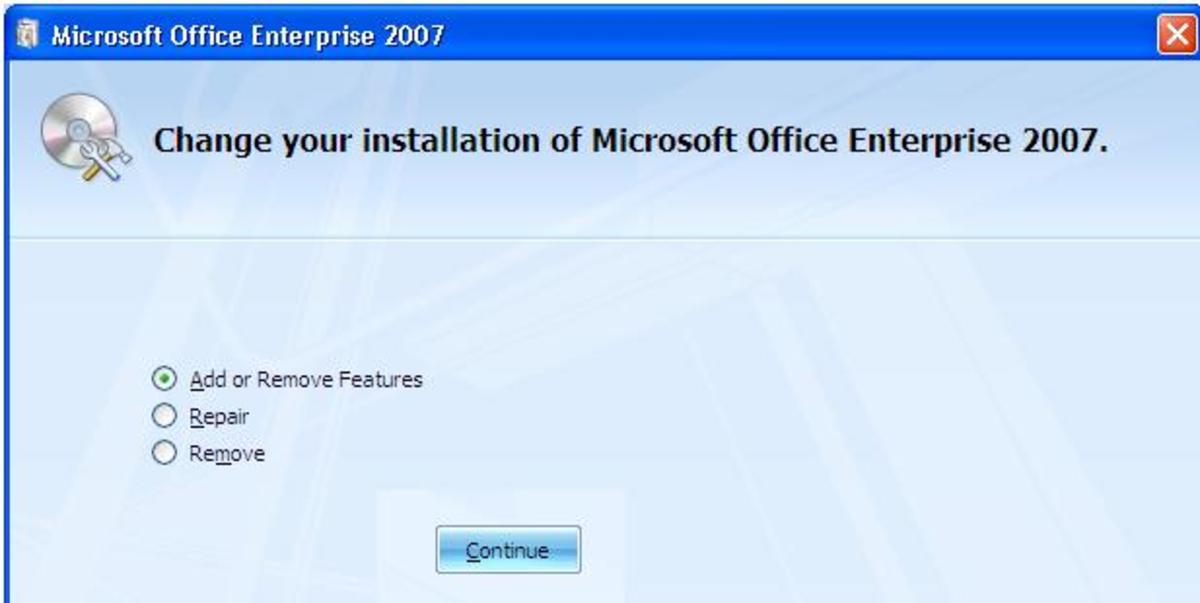
Follow These Steps to Install Microsoft Office Document Imaging Scanning Software. Click on start, control panel and then click on add or Remove programs option. Once the add or remove programs window opens, click on Microsoft Office Enterprise 2007 or whichever version you are using. Then click on change.
Ocr tool in microsoft office document imaging fileuc
Clip art and pictures. Add clip art to your file. Insert pictures from your computer. Crop a picture. Rotate a picture or other shape. Change the brightness, contrast, or sharpness of a picture. Add or change an effect for a picture. Apply an artistic or color effect to a picture. Videos: Add and format pictures.
How to Edit Microsoft Office Document Imaging OCR
The Microsoft Office Document Imaging has two components - the scanning and the imaging, respectively. The scanning component captures images from a compatible scanning device, just like any other scanning software, and then automatically converts text from these scanned images via OCR. Finally the imaging component enables you to view the.

Installing Microsoft Document Imaging In Office 2010.
Scan your document according to the instructions for your scanner, and save it to your computer as a .pdf file. In Word, click File > Open. Browse to the location of the PDF file on your computer and click Open. A message appears, stating that Word will convert the PDF file into an editable Word document. Click OK.
How to Install and Use Microsoft Office Document Imaging HubPages
Inside the installer window, click on the Customize Button as shown below. Next the installer will list down all the installable items. Inside the Installation Options tab, under Office Tools look for Microsoft Office Document Imaging and select Run all from My Computer from the DropDownList. Then, expand the Microsoft Office Document Imaging.
Usando o Microsoft Office Document Imaging para digitalizar texto no Word 2023
Method 3: Install MODI with the 2007 Office System media. To use MODI in the 2007 Office System together with Office 2010, follow these steps: Start the 2007 Office System setup process. Review, and then accept the software license. Click Customize to open the installation options. On the Installation Options tab, click the down arrow and.
How to Install and Use Microsoft Office Document Imaging HubPages
Microsoft Office Document Imaging uses Microsoft Document Imaging Format (MDI), a file format based on the Tagged Image File Format (TIFF) that is designed to store images by page layout. In Office Document Imaging, you can open and save files in the MDI format as well as the Tagged Image File Format (TIFF) format.
How to Install and Use Microsoft Office Document Imaging HubPages
1 Answer. Sorted by: Reset to default. This answer is useful. 1. This answer is not useful. Save this answer. Show activity on this post. According to my search and test, Office2016 has OCR function and you need to turn it on manually. I beieve the OCR is available in Windows 10 or Word 2016.
Cómo encontrar e instalar Microsoft Office Document Imaging (En 7 Pasos) Techlandia
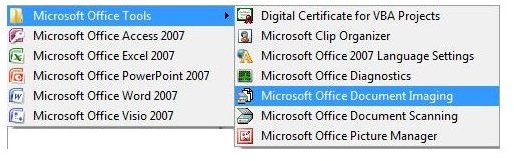
First, you want to check to see if you already have it installed. In Office 2007, go to Start > Programs > Microsoft Office > Microsoft Office Tools, and you should see Microsoft Office Document Imaging. If you don't see it there, never fear. It's an optional part of the Office install. In Control Panel, go to Add/Remove Programs, select.

Microsoft Office Document Imaging is MS Office Standard 2007 Microsoft Community
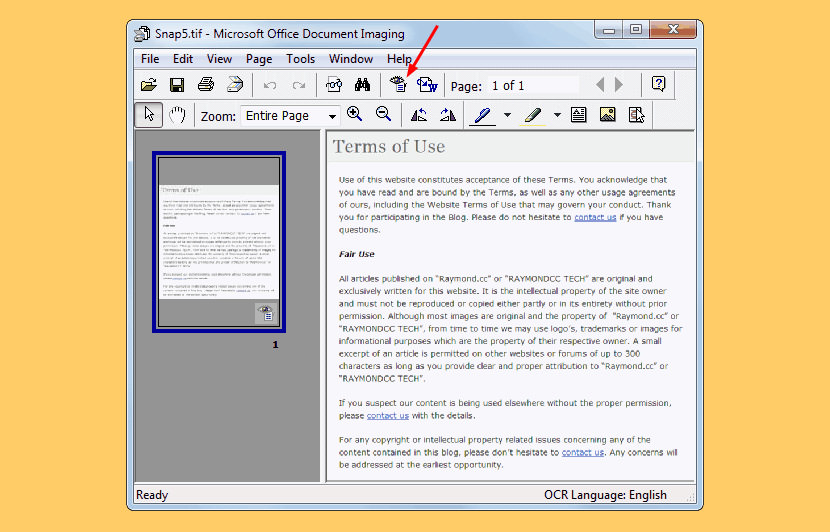
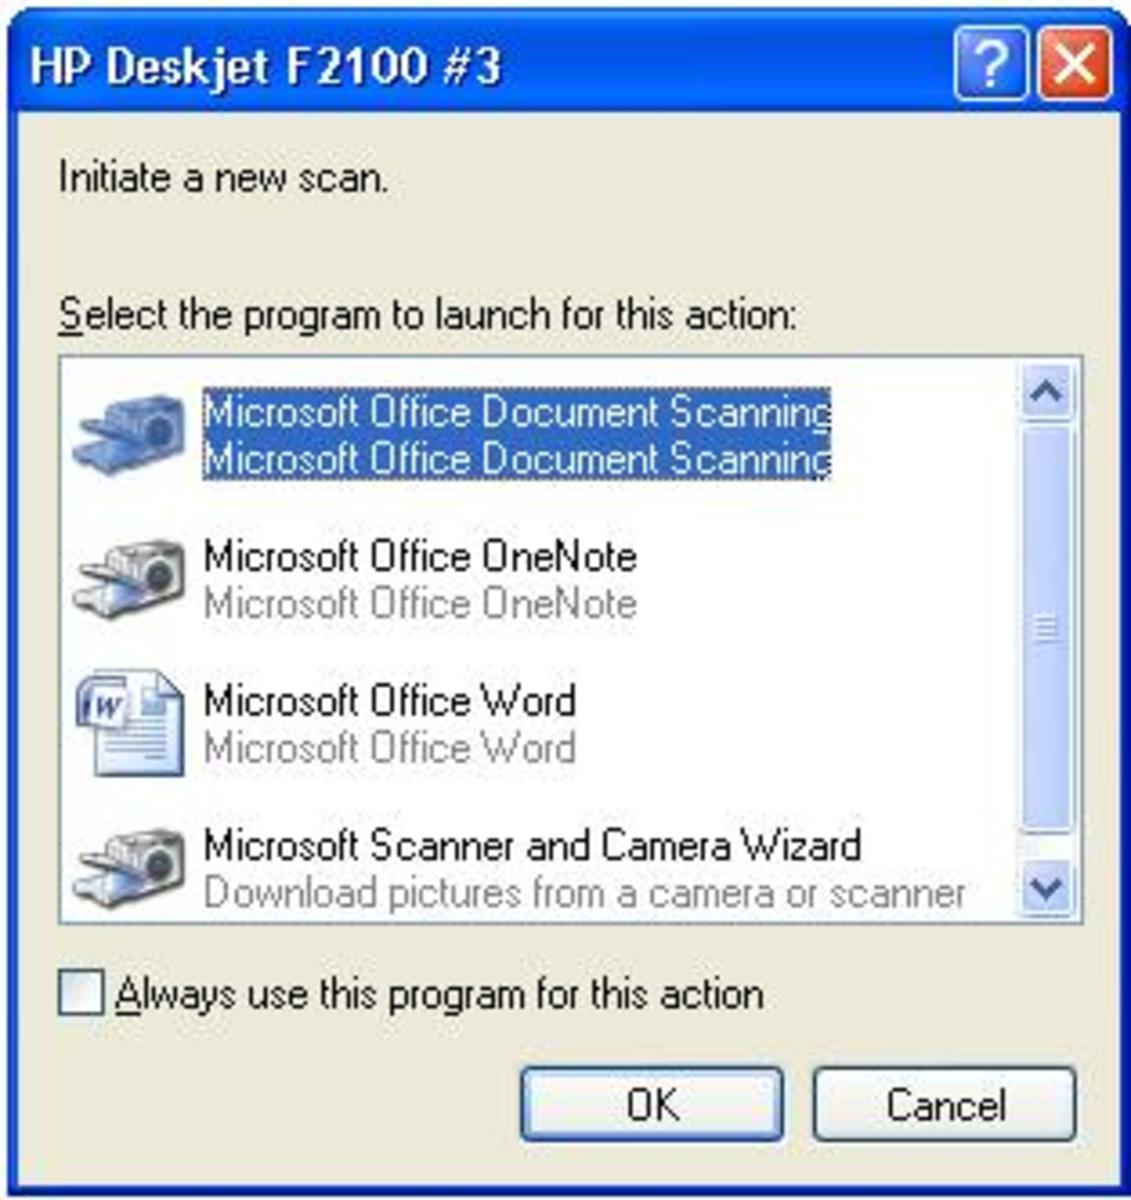
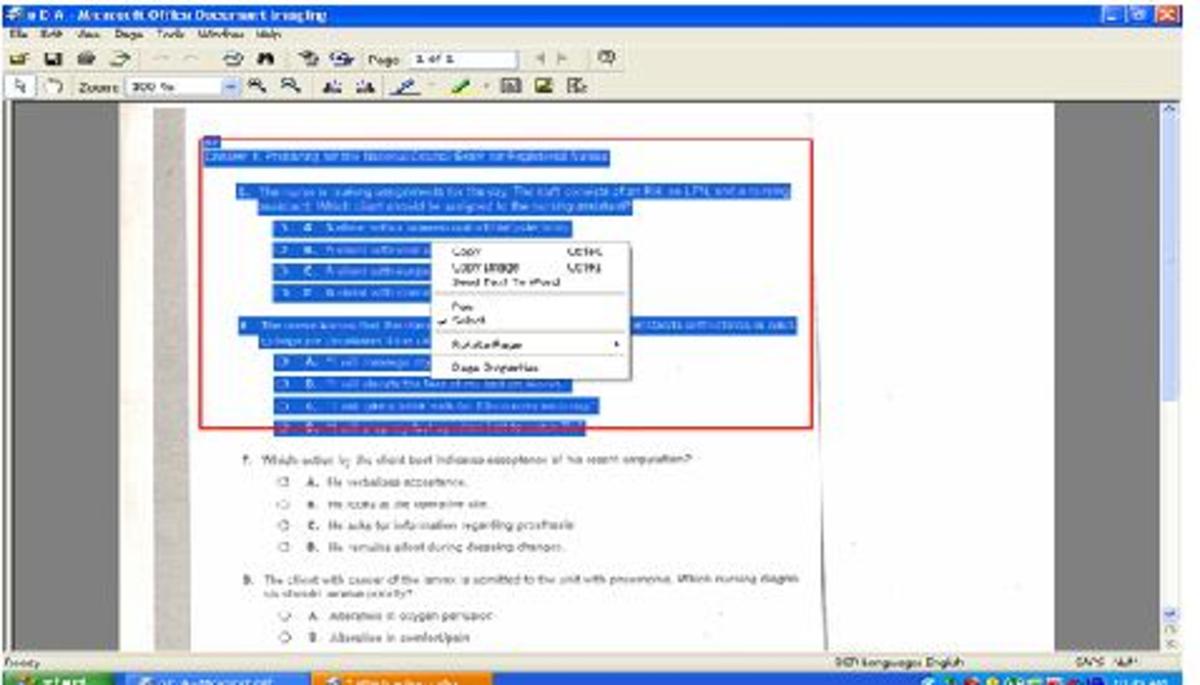
Go to the start menu programs and inside Microsoft Office Tools open Microsoft Office Document Imaging. Inside MODI, click the Open icon and select your TIFF image from the dialog. Once the image is loaded inside MODI, click the Recognize Text Using OCR button. Give it time to do the OCR. Once it's done, click the Send Text to Word button.
How to Install and Use Microsoft Office Document Imaging HubPages
One the first page of the wizard, leave the "Add or Remove Features" option selected and click Continue. On the second page, expand the Office Tools icon, click the Microsoft Office Document Imaging icon, and choose "Run from My Computer". Click Continue and follow any instructions (it may ask for the location of the installation files if they.
How to Install and Use Microsoft Office Document Imaging HubPages
Find dialog box. Go To Page dialog box. Indexing Service dialog box. Insert File dialog box. Launching Scanner Driver dialog box. Microsoft Office Document Image Writer Properties dialog box. Scan New Document dialog box. Options dialog box - Annotations tab. Options dialog box - Compression tab.